Sensor Overview
ParamaIoT Wireless AC and Three-Phase Current Meters measure the root mean square (RMS) current of an alternating current (AC) system using a current transducer (CT). To monitor, the CT wraps around the “hot” wire of a single (AC) or three-wire (hot, common, ground (optional)) power system.
The installation is nearly the same whether it’s an AC or Three-Phase Current Meter.
ParamaIoT Wireless AC နှင့် Three-Phase Current Meter များသည် လက်ရှိ transducer (CT) ကို အသုံးပြု၍ လက်ရှိ အစားထိုး(AC) စနစ်၏ root mean square (RMS) ကို တိုင်းတာသည်။ စောင့်ကြည့်ရန်အတွက်၊ CT သည် "ပူသော" (AC) ဝိုင်ယာတစ်ခုတည်း သို့မဟုတ် ဝိုင်ယာ သုံးကြိုး (hot, common, ground (ချန်လှပ်ထားနိုင်သည်)) ဓာတ်အားစနစ် များကို ပတ်ထားနိုင်သည်။
တပ်ဆင်မှုမှာ AC နှင့် Three-Phase Current Meter တို့သည် များသောအားဖြင့် တူညီသည်။
Installation Steps
Note: If this is your first time setting up your Monnit system, you must first set up your ParamaIoT account and connect your Gateway to ParamaIoT before registering your sensor. See this article for steps outlining how to get started: Creating a ParamaIoT account.
Step 1.
Remove the Current Meter from the package. If installing an industrial meter, attach the antenna.
ဗူးထဲမှ Current Meter ကို ယူပါ။ အကယ်၍ Industrial အမျိုးအစားကို တပ်ဆင်ပါက Antenna ကို တပ်ရန်လိုအပ်ပါမည်။
Step 2.
Register the meter in ParamaIoT. Do not install the batteries until ParamaIoT tells you.
- Walk-through guide
- How-to video
ParamaIoT တွင် တပ်ဆင်မည့် မီတာကို Register ပြုလုပ်ပါ။Software တွင် register ပြုလုပ်သည့်အချိန် ParamaIoT Software မှ တပ်ဆင်ရန်စာမပြသေးလျှင် ဘက်ထရီကို မတပ်ဆင်ပါနှင့်။
- Walk-through guide (Comming Soon)
- How-to guide (Comming Soon)
Step 3.
Determine the meter’s installation location. We recommend placing the meter in the location and making sure it reports to the gateway before final installation.
Sensors တပ်ဆင်တည်မည့် နေရာကိုသတ်မှတ်ပါ။ Sensor ကို တပ်ဆင်မည့်တည်နေရာတွင် ထားကာ အပြီးသတ်တပ်ဆင်ခြင်းမပြုမီ Sensor နှင့် Gateway နှင့် ကောင်းစွာအလုပ်လုပ် မလုပ် ကိုသေချာအရင်စစ်ဆေးသင့်သည်။
Step 4.
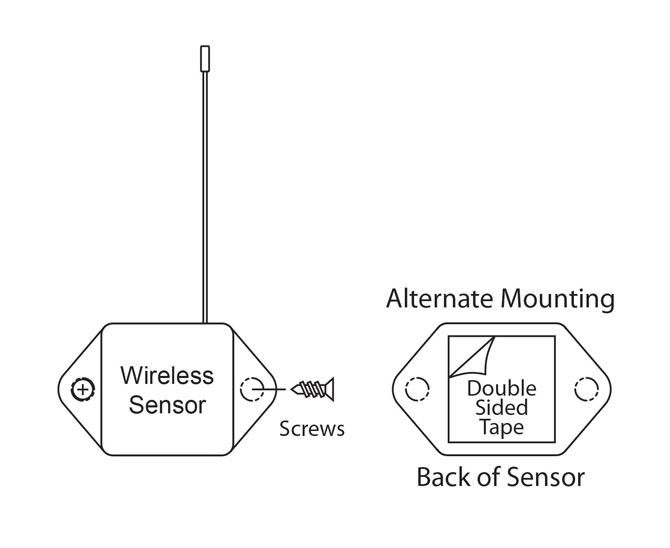
After ensuring that the meter is communicating with the gateway, mount the meter in a location that will leave enough room for the CT(s) to clip on the power wire(s). Mount the meter with the provided screws or double-sided tape.
Sensor သည် Gateway နှင့် ဆက်သွယ်ချိတ်ဆက်ထားကြောင်း သေချာလျှင်၊ CT(များ) တွင် ပါဝါကြိုး(များ)ကိုညှပ်ရန်၊ CT(များ) တပ်ဆင်ရန်အတွက် နေရာအလုံအလောက်ချန်ထားပြီး Sensor ကို တပ်ဆင်ပါ။ Screws သို့မဟုတ် နှစ်ဘက်တိပ်ဖြင့် မီတာကို တပ်ဆင်နိုင်သည်။
Step 5.
Attach the CT(s) to the power wire(s) you wish to monitor.
Note: The CTs are designed to clip around a single current-carrying wire. Ensure that the CT is NOT wrapped around a cable with a common and live wire; otherwise, the sensor will read approximately 0.00 amps. See the diagram below for appropriate CT installation.
တိုင်းတာကြည့်ရှုလိုသော ပါဝါကြိုး(များ)တွင် CT(များ)ကို ချိတ်ပါ။
မှတ်ချက်။ CT များကို Single Current သယ်ဆောင်ထားသော ဝါယာကြိုးအတွက် ပြုလုပ်ထားခြင်းဖြစ်သည်။ Common နှင့် Live နှင့်အတူ ပတ်ထားခြင်းမရှိကြောင်း သေချာအောင်စစ်ဆေးပါ။ မဟုတ်ရင် Sensor က ခန့်မှန်းခြေ 0.00 amps ကို ဖတ်ပါလိမ့်မယ်။ သင့်လျော်သော CT တပ်ဆင်မှုအတွက် အောက်ဖော်ပြပါ ပုံတွင်ကြည့်ရှုနိုင်သည်။
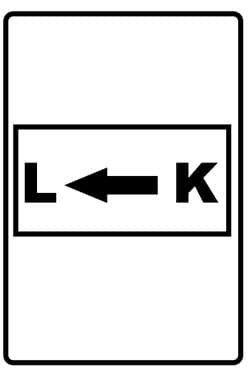
Note: Some CTs come with a direction arrow, it does not matter which direction the current is flowing when you attach the CT.
မှတ်ချက်- အချို့သော CT များတွင် ဦးတည်ချက်မြှားပါသည်များဖြင့် လာတတ်သည်၊ CT ကို တပ်ဆင်/ချိတ်လိုသည့်အခါ မြား မည်သည့်လမ်းကြောင်း စီးဆင်းနေသည်မှာ အရေးမကြီးပါ။