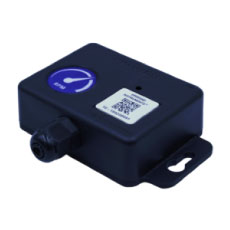
Hall Effect Sensor
To work, the sensor uses an electromagnetic effect called Hall effect and needs a special sensor to achieve this measurement. This sensor is included when you buy an RPM Phantom sensor and it’s a 2 meters (6.56 Ft) line with a T head on one side and a LEMO connector in the other.
The pack also includes a neodymium magnet with 12 mm (~ 0.5 inches) in diameter. This magnet creates the magnetic field necessary for the sensor to work properly. (Also, we will send you a spare magnet).
အလုပ်လုပ်ရန်၊ အာရုံခံကိရိယာ(Sensor) သည် Hall effect ဟုခေါ်သော လျှပ်စစ်သံလိုက်အကျိုးသက်ရောက်မှုကို အသုံးပြုပြီး ဤတိုင်းတာမှုအတွက် အထူးအာရုံခံကိရိယာတစ်ခုလည်း လိုအပ်ပါသေးသည်။ RPM Phantom အာရုံခံကိရိယာကို ဝယ်ယူသောအခါတွင် RPM Sensor ပါဝင်ပြီး တစ်ဖက်တွင် T ဦးခေါင်းပါသည့် 2 မီတာ (6.56 ပေ) လိုင်းတစ်ခုနှင့် အခြားတစ်ဖက်တွင် LEMO ချိတ်ဆက်ကိရိယာတစ်ခုပါရှိသည် (ကြိုး)ပစ္စည်းပါ ပါရှိသည်။
Installing the RPM Phantom
To achieve correct measurements using the RPM Phantom Sensor there are some considerations we need to understand. The first step to follow is to attach the magnet to the surface of your machine with the North Pole facing out of the machine. Be sure to attach it very firmly so the centrifugal force would not shoot out the magnet.
An easy way to know which pole are you looking at is to compare the magnet with our magnetic key (the one which reset the phantom). All magnetic keys have the south pole facing towards the key, this means if one face of your magnet feels attracted to the key, that face it’s the North Pole.
Once done, locate the sensor with the bump side facing towards the magnet with a maximum distance of about 1 cm (0.3 inches). If located farther than this, the sensor could have some difficulties to read the correct velocity of the machine.
Installing the RPM Phantom
RPM Phantom Sensor ကို အသုံးပြု၍ မှန်ကန်သော တိုင်းတာမှုများ ရရှိရန် အတွက် နားလည်ထားရမည့် လိုအပ်သော ထည့်သွင်းစဉ်းစားမှု အချို့ရှိပါသည်။ လိုက်နာရမည့် ပထမအဆင့်မှာ စက်၏အပြင်ဘက်သို့ မျက်နှာမူထားသော မြောက်ဝင်ရိုးစွန်းနှင့် သင့်စက်၏မျက်နှာပြင်တွင် သံလိုက်ကို ချိတ်ထားခြင်းဖြစ်သည်။ ချိတ်ထားမည့် သံလိုက်အား အလွန်အမင်း ခိုင်မြဲစွာ သေချာ ချိတ်ထားရန် လိုအပ်သည်၊ မဟုတ်ပါက centrifugal force က သံလိုက်ကို လွှင့်/ပစ်ထုတ် လိုက်နိုင်သည်။
ဘယ်ဝင်ရိုးစွန်းကို ကြည့်နေတာလဲ သိရန် လွယ်ကူသောနည်းလမ်းမှာ သံလိုက်ကို ကျွန်ုပ်တို့၏ သံလိုက်သော့ဖြင့် နှိုင်းယှဉ်ခြင်းဖြစ်သည် (Phantom ကို reset ပြုလုပ်သည့် အရာ)။ Magnetic Keအားလုံးသည် တောင်ဝင်ရိုးစွန်းများ ရှိသည်၊ ဆိုလိုသည်မှာ သင့်သံလိုက်၏မျက်နှာတစ်ခုသည် သော့အား ဆွဲဆောင်နေသည်ဟု ခံစားရပါက ထိုမျက်နှာသည် မြောက်ဝင်ရိုးစွန်း ဖြစ်သည်။
ပြီးသည်နှင့်၊ အများဆုံး 1 စင်တီမီတာ (0.3 လက်မ) ခန့်ရှိသော အကွာအဝေး ဖြင့်သံလိုက်ဖက်သို့ အဖုအထစ်ရှိသောအခြမ်းဖြင့် အာရုံခံကိရိယာမျက်နှာမူထား၍နေရာချပါ။ ၎င်းထက် ဝေးသောအကွာအဝေးတွင်ရှိနေပါက၊ အာရုံခံကိရိယာသည် စက်၏ အလျင်ကို မှန်ကန်စွာဖတ်ရန် အခက်အခဲအချို့ရှိနိုင်သည်။
DigivibeMX Configuration
Add Phantom’s
Manually
You can add phantoms by using an 11-digit ID code and selecting the Manual button. The Code window opens. Manually enter the 11-digit Phantom ID code from the sensor’s QR label (2-digit sensor model code + 9-digit sensor serial number) into the Code text field. Then click the Ok button. The manually entered sensor will appear in the Phantoms added section. Sensors may be removed from the group using the Delete option.
Scanning the QR code
(PC, laptop, or tablet computer camera required): Click the QR Code Reader button. The Code Bar Reader window opens.
Naming and configuration
We can organize ur phantom devices with the following tools:
- With the group box, we can select a previous group name from the list or type a new one to create a group.
- In the name box, we can select a name for our device o to simplify the phantom identification.
- On the description box, we select what kind of phantom are we using.
Once you’re finished click next.
Assign device
In the next window, we find the Assing Channels screen, here we can assign the device to an analysis point in a selected machine from the tree, we can only set one point per channel:
Set the Alarm
Next, we have the set phantom alarms window, here we can set a preset internal temperature threshold.
Completing Phantom Configuration
To learn more about our Phantom system please visit the Continuous Vibration Monitoring section.

